Filtering in Tableau with parameters
Scenario here is the dashboard he was working on utilized multiple datasources and to filter all of the sheets in the dashboard by Year. Ordinarily when using multiple datasources, wewould have to utilize a Quick Filter for each individual datasource. Given that there are and find a way to achieve the same functionality, but with only one Quick Filter instead of four.

Note: if you are new to Tableau, this is what a Quick Filter looks like. It allows users to slice and dice data interactively.
There are many ways of solving this, whether through Data Blending or Dashboard Actions. In this case though, those options would cause problems with existing functionality, so I decided to go with parameters as filters.
Parameters are extremely simple – they allow users to select or input a value. That value can then in turn be used in calculations, and subsequently, filters. You can even set the values that users can select to be automatically created from a field in your data, which saves time.
In this situation my goal was simple. I wanted to create a parameter that would allow users to select a year, and then create a calculation that would use that parameter to filter to the selected year. Here is what I did - if you want to practice on your own, you can follow these directions using the Superstore and CoffeeChain datasets that come pre-loaded in Tableau (just click “Connect to Data”). Begin on the CoffeeChain datasource.
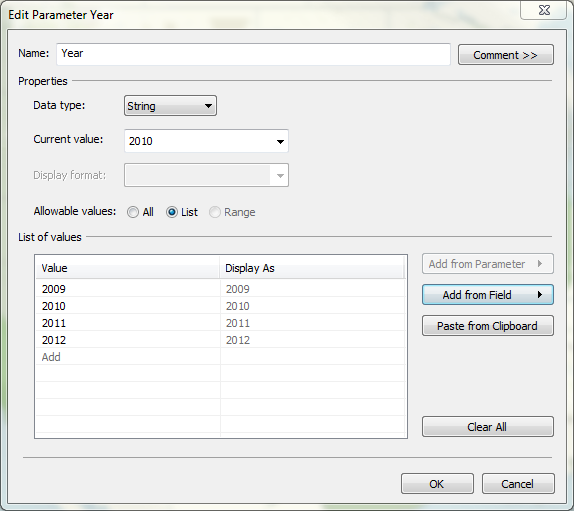
1. Create a parameter called ‘Year’ and give it a list of years applicable to the worksheet
- Right-click the Data Window and select “Create Parameter”
- Set the Data Type to “String” and the Allowable values to “List”
- Note: Because the two data sources have two different date data types (Superstore Sales: Date and Time, CoffeeChain: Date) we cannot set our parameter to a date data type for it won’t be compatible to both. In cases where all data sources have the same date data type, the parameter can be set to that data type.
- Inside the list, set the years the Year parameter should have access to within the data source and click OK to create the parameter.

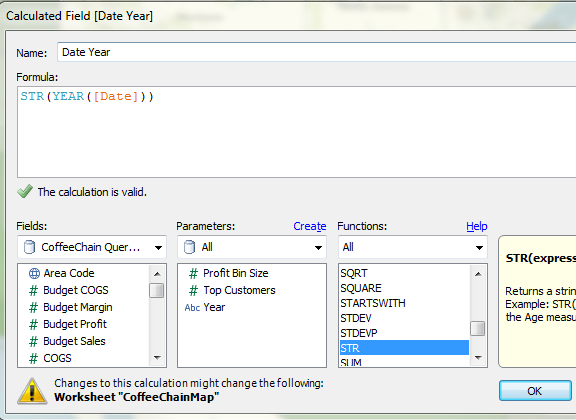
2. Create a calculated field which will get the string version of the date’s year
- Because the data source’s date field has a date and time data type, we need to create a string version of the year to be able to compare it to the parameter just created, which was set to string.
- Right click the field “Date” under dimensions and select “Create Calculated Field”
- Name the Calculated field the data dimension with ‘Year’ added at the end. Wrap the date dimension field in the Formula window in string (STR()) and year (YEAR()) functions and select OK to create the calculated field. This calculation will always result in the year of the Date field.

3. Use the calculated field as a filter and link it to the Year parameter
- Drag the newly created calculated field (“Date Year”) to the Filters view card and a filter box will appear.
- Under the General tab, select “Use All” to use all of the different years in the data source and select the Condition Tab.
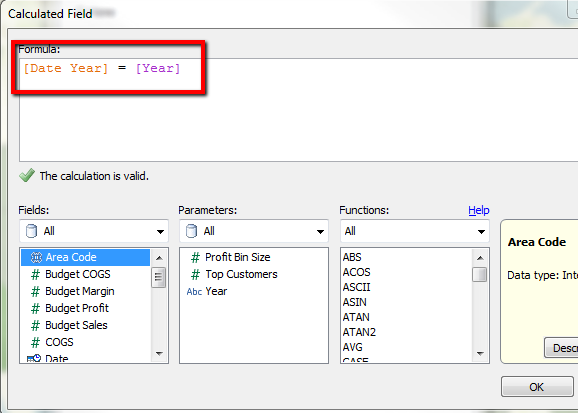
- Select the “By Formula” option and click the “…” button to open the formula creation window. This is where the calculated field and parameter will be linked.
- Set the calculated field (Order Date Year) to equal the parameter (Year) and click OK.
- Click OK once more to create the Filter based on the calculated field which is linked to the parameter.


4. Enable users to select values using the parameter
- Right click the Year parameter and select “Show Parameter Control”.
- Select the black dropdown arrow located at the top right of the Parameter Control panel and select the “Slider” option.
- Open the dropdown menu again, select customize, and select “Show buttons” to remove the buttons from the control panel.
- Note: There are many options to choose when customizing the control panel. Explore the different options until a panel is created that is appropriate for the purposes of the filter.
5. Repeat step 2 for every data source that will have a date dimension that needs to be filtered.
6. Repeat step 3 for every sheet that will need to be filtered by its date.
In the dashboard, every sheet that has a filter linked to the Parameter will be affected when the parameter control is changed. It takes a couple moments to set up, but the end result is clean and easy to use, as you can see here.
Comments
Post a Comment