Convert a Field to a Date Field
Verifying Date Fields
The date field might appear as a string when connecting to the Data Source...
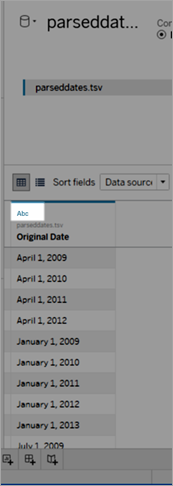 |
Or as a string in the Dimensions Pane.
 |
When dates are interpreted as strings, you will lose all of the features and conveniences of working with date fields, such as drilling down, using date calculations, and switching between Continuous and Discrete measures.
If your dates aren't interpreted correctly, take the following steps in order:
- Change the data type of the field
- Create a calculation using the DATEPARSE function
- Create a calculation using the DATE function
Change the data type of the field
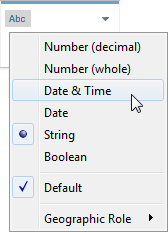
The first step in resolving a date field interpretation issue is to make sure the data type is set to Date or Date & Time.
- In the Data Source or Dimensions pane, click the data type icon and change the data type to Date or Date & Time
- Inspect the data in the view or Data Source pane. If you see many Null values, return the data type to String and proceed to Create a calculation using the DATEPARSE function to correct the issue.

Create a calculation using the DATEPARSE function
Dates are stored in a nearly infinite array of formats. Some date fields have years before months, others separate the parts of the date with periods, and still others use a combination of formats. When Tableau cannot interpret a date field, it might be because the particular format cannot be translated.
The DATEPARSE function lets you clearly define which parts of your field are which parts of a date. In essence, you are creating a map that Tableau can use to translate the string into a date field. This map is referred to as the format.
Note: This function is available through the following connectors: non-legacy Excel and text file connections, Amazon EMR Hadoop Hive, Cloudera Hadoop, Google Sheets, Hortonworks Hadoop Hive, MapR Hadoop Hive, MySQL, Oracle, PostgreSQL, and Tableau extracts. Some formats may not be available for all connections.
Creating the DATEPARSE calculation
- Inspect the current format of your date field. Note where months, years, hours, and days are displayed in your field. You will need this information for the DATEPARSE function.
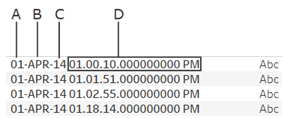 A. Day of monthB. MonthC. YearD. Hour, minute, second, millisecond, period
 - Right click your date field in the Dimensions pane and select Create > Calculated Field.
- In the dialog, write the DATEPARSE function. The DATEPARSE function has two parts: the format and the string. The string is field you wish to convert, which must be a string data type.
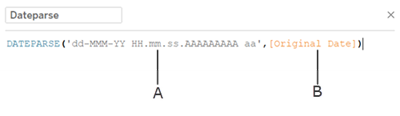 A. FormatB. StringThe format is the guide Tableau will use to interpret the string as a date. Each part of a date or time string has a matching symbol, as seen in the table below. The format must exactly duplicate the way that the date is displayed. For example, if a single year code ("Y") is used when the string has a 2-digit year code ("97"), the calculation might return null values.Note: The exception to the format exactly duplicating the displayed string is that long form parts of dates ("September") can be formatted with four symbols ("September" = "MMMM").The format must include all spaces, hyphens, and other non-alphanumeric symbols in order to interpret the string correctly.
Date Field Symbols
Date Part Symbol Example String Example Format Year Y 2016, 97, 2 YYYY,YYY,YY,Y Era G AD, Anno Domini GGGG Month M 9, 09, Sep, September M, MM, MMM, MMMM Week of year (1-52) w 8,27 w, ww Day of Month d 1, 15 d, dd Day of Year (1-365) D 23, 143 DDD,DDD Period a AM, am, PM aa, aaaa Hour (1-12), Hour (0-24) h, H 1, 16, 03 h, HH, hh Minute m 8,59 m, mm Second, Millisecond s, A 24, 2, 34532 ss, s, AAAAA Note: Some date formats are not supported by all databases and file types. - Check your format against the string displayed in Tableau. If the symbols and formatting is correct, select OK to create the new calculated field. The calculated field will act as a date field in your view.

Hyper extracts
For .hyper extract data sources, the symbols are defined by the Unicode Consortium. For more information.
Locale considerations
The DATEPARSE function relies on the locale specified by your computer settings to interpret and then display the strings that you want to convert. More specifically, the locale will affect whether a certain format can be recognized. This means that if a format is not supported by the locale, then you might see a null value or no value returned. For example, suppose you have the following string in your data:
12Sep2016:9:8:8.6546
The values returned from the DATEPARSE function for this string are different based on locale. In the English locale you will get a certain value, but for the Japanese locale you will get no value. In this case, no value is returned because the Japanese locale does not recognize “Sep.”
Datetime value
| English locale | Japanese locale |
|---|---|
| #9/12/2016 9:08:09 AM# | - |
As with all dates, after you have used the DATEPARSE function to convert a string to a datetime type, by default Tableau will display the datetime value in the default format of your locale. If the locale changes, the result of the DATEPARSE function might display your new datetime value in a different format.
Create a calculation using the DATE function
If the DATEPARSE function is not available for the data that you're working with, or the field you are trying to convert is a number data type, you can use the DATE function instead.
The DATE function converts a number, string or date expression to a date type. When you create a calculation that uses the DATE function, Tableau creates a new field in your Tableau data source that allows you to interact with your date data as a date. To successfully produce date values from a number, string, or date expression using the DATE function, Tableau needs to be able to interpret the components of the string into date parts. After the components of the date are identified, Tableau uses the computer locale to determine the default format of the date.
For example, suppose the table you're working with contains a column of date data that is called "Original Date." The "Original Date" column is a string type.
| Original Date |
|---|
| 03Jan2017 |
| 05Jan2017 |
| 07Mar2017 |
| 19Mar2017 |
| 30Apr2017 |
In this case, you can create a calculated field called "New Date" that uses an expression in a DATE function to convert the string values in the "Original Date" field into date values.
For this example, the date expression is comprised of the LEFT function to isolate the day component, the MID function to isolate the month component, and the RIGHT function to isolate the year component.
DATE (LEFT([Original Date], 2) + "/" + MID([Original Date],3,3) + "/" + RIGHT([Original Date],4))
The "New Date" calculation produces the following column:
New Date
|
|---|
| 1/3/2017 |
| 1/5/2017 |
| 3/7/2017 |
| 3/19/2017 |
| 4/30/2017 |
In this example, the new date values are based on an English locale and default formatting.
Comments
Post a Comment